
For Aprilia RS 125 RS125 RSV Mille Tuono SL 1000 RSV4 Gear Indicator Ecu Direct Mount 1-6 Speed Display
+ ٢٥٫٩٩ ر.ق. الشحن
For Aprilia RS 125 RS125 RSV Mille Tuono SL 1000 RSV4 Gear Indicator Ecu Direct Mount 1-6 Speed Display
- العلامة التجارية: Unbranded
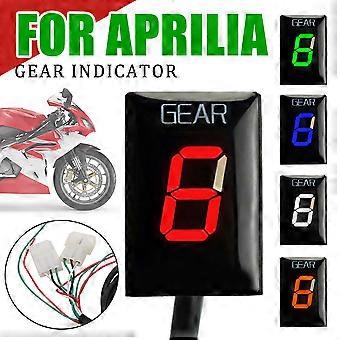
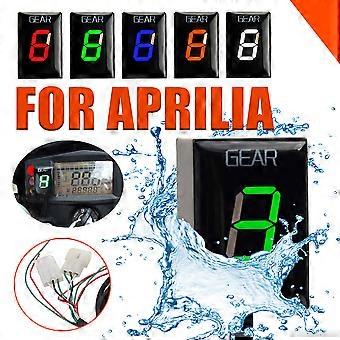


For Aprilia RS 125 RS125 RSV Mille Tuono SL 1000 RSV4 Gear Indicator Ecu Direct Mount 1-6 Speed Display
- العلامة التجارية: Unbranded
| سعر البيع القطاعي المقترح: | |
| السعر: | |
| أنت توفر: | ٩٠٫٠٠ ر.ق. (25%) |
في المخزون
سياسة الإرجاع لمدة 14 يوما
نقبل وسائل الدفع الآتية
الوصف
For Aprilia RS 125 RS125 RSV Mille Tuono SL 1000 RSV4 Gear Indicator Ecu Direct Mount 1-6 Speed Display
- العلامة التجارية: Unbranded
- الفئة: أجزاء المحرك في السيارة
-
اللّون: green
- هوية Fruugo: 223612809-477430090
- EAN: 5382840654175
معلومات سلامة المنتج
يرجى الاطلاع على معلومات سلامة المنتج الخاصة بهذا المنتج الموضحة أدناه
يتم توفير المعلومات التالية من قبل بائع التجزئة المستقل التابع لجهة خارجية الذي يبيع هذا المنتج.
ملصقات سلامة المنتج

التسليم والرد
يُرسل خلال ٣ أيام
-
STANDARD: ٢٥٫٩٩ ر.ق. - التسليم بين الجمعة 26 ديسمبر 2025 – الخميس 01 يناير 2026
يُشحن من الصين.
نحن نبذل قصارى جهدنا لضمان أن تصلك المنتجات التي تطلبها بالكامل وطبقاً المواصفات التي حددتها. إلا أنه في حال تلقيك طلب غير كامل أو أغراض تختلف عن تلك التي طلبتها أو كان هناك سبب آخر يدعوك لعدم الرضاء عن الطلب، فيمكنك رد الطلب أو أي منتجات يتضمنها الطلب واسترداد ما دفعته من أجل تلك الأغراض بالكامل. عرض سياسة الرد الكاملة
تفاصيل امتثال المنت
يرجى الاطلاع على معلومات الامتثال الخاصة بهذا المنتج الموضحة أدناه.
يتم توفير المعلومات التالية من قبل بائع التجزئة المستقل التابع لجهة خارجية الذي يبيع هذا المنتج.
الجهة المصنعة:
توضح المعلومات التالية تفاصيل الاتصال الخاصة بالجهة المصنعة للمنتج ذي الصلة والذي يُباع على Fruugo.
- manufacturer_trading_name
- Xiamen Cheering Industrial
- Room 401, No. 35, Yuanshan North Lane, Huli District
- Xiamen
- CN
- 361000
- fruugo202204@163.com
- 139 7376 5108
الشخص المسؤول في الاتحاد الأوروبي:
توضح المعلومات التالية معلومات الاتصال الخاصة بالشخص المسؤول في الاتحاد الأوروبي. الشخص المسؤول هو المُشغل الاقتصادي المُعيّن والكائن في الاتحاد الأوروبي والمسؤول عن التزامات الامتثال المتعلقة بالمنتج ذي الصلة الذي يُباع داخل الاتحاد الأوروبي.
- Van Lavazza
- Y & H S.R.L.
- Via Gravina 21 MT matera
- Puglia
- Trani
- IT
- 75100
- itlyhsrl@gmailcom
- 0039 3917722149